Thursday, September 29, 2016

Unit testing Fake IP Address for Website

We were trying to fake the IP Address for one of our website for different visitors. Such as if some one visits the site from Australia or New Zealand then site should redirect to au or Beefeaterbbq.co.nz respectively.
We were able to test the redirect for Australia quite easily as we were based in Australia but for New Zealand it was bit of hard work as we could not find any Proxies that could fake NZ IP address for us. After doing searching and bit of struggle i have figured out we can alter Fiddler script to fake request header.
Therefore, I was able to add one line to output IP Address of my choice to whatever site as long as Fiddler intercepts the call from browser. Below are the steps to add custom header and test the site.

Pre-requisite

  1. Fiddler 2
  2. Any Browser :>

Steps to Fake IP Addresses

  • Open Fiddler and goto Rules
  • Select Customize Rules - This will open the CustomRules.js file in notepad


  • Search for function OnBeforeRequest

static function OnBeforeRequest(oSession: Session) {


    • At the end of function add below line

    oSession.oRequest.headers.Add("X-Forwarded-For", "14.1.63.255");  // NZ IP Address, DNS name or IP address of target server


    • Save the file
    • Make sure on fiddler -> File (Menu) -> Capture Traffic is checked

    • Once you are done don't forget to remove your line from CustomRules.js

    Wednesday, September 28, 2016

    Microsoft Bot Builder .Net Using FormFlow - Part 3

    In this part we will test our live azure service on Microsoft Bot Emulator Channel.

    Let first make sure our azure service is up and running.

    Live Bot Url Testing


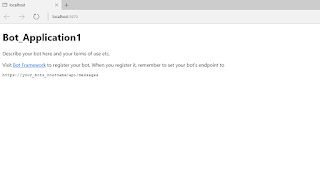
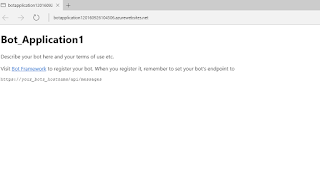
    Make sure azure live url (http://botapplication120160926104506.azurewebsites.net/api/messages) on browsing returns result similar to below screen shot.


    Make sure live azure service returns success on bot page


    Connecting to Microsoft Bot Emulator Channel


    Lets launch emulator and enter the below fields

    • Bot Url
    • Microsoft App Id
    • Microsoft App Password


    Once you enter the above field and enter any message you will see something like below screen shot.


    The reason for failing of message is that live azure could not connect back to Emulator url.
    In order to make our bot url available to azure live url we need to work with NGROK.

    NGORK

    Ngor is small utility which makes local port number available to outside world.
    you can download the ngork from the following url (https://ngrok.com/download)

    Once downloaded the ngrok run the following command through command prompt
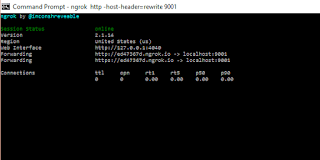
    ngrok http -host-header=rewrite 9001


    Once you run the command you will see the below output


    The forwarding url is the url availble to outside world, which is mapped to our local port 9001
    Copy that url and paste in Microsoft Emulator Url


    Now you type the message you will see the output 


    Things to remember


    • Bot url must have /api/messages appended
    • Emulator url can have http or https 
    • Bot url can have http or https
    In next part we will modify our bot to use real world example of registering product.

    Microsoft Bot Builder .Net Using FormFlow - Part 2

    In this part we will deploy the Bot Application that we have created in Part 1 to Azure Service and also register our bot to Bot Directoty in order to use Live Azure Service Url.

    Publishing Bot

    Firstly, we will publish the Bot to Azure. In order  to publish to Azure Services you will need to purchase azure services or If you have MSDN subscription for visual studio then you can have free monthly credit of $200 something.


    • Coming back to Publish, right click to project and select publish. 


    • Then, click on Microsoft Azure App Service. 
    • Then, click on publish, you will have to with your azure login credentials. 
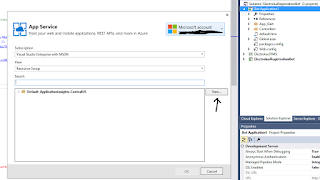
    • Once login you should be seeing below screen


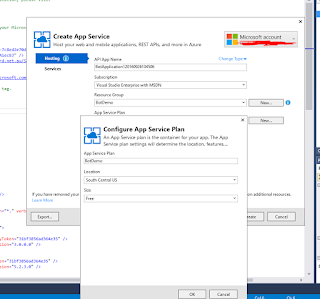
    • Click New button this will open popup to create new App inside Azure Service. Fill the required fields and select OK


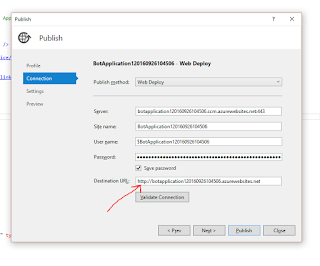
    • Once you have complete wizard will provide all the details of server, url, deployment credentials and etc. 

    We will need only live url for our Bot and everything else can be leave for now. Save the password so you don't have to remember it.


    • Click publish to publish the site. Once site is published successfully. you should be seeing below screen.


    Registering Bot


    In order to use live url we would need to register our Bot to https://dev.botframework.com/.
    Please follow the below steps to register your newly created Bot and generate MicrosoftAppId and MicrosoftAppPassword.


    • Go to the given url https://dev.botframework.com/bots/new
    • Login with Microsoft Credentials
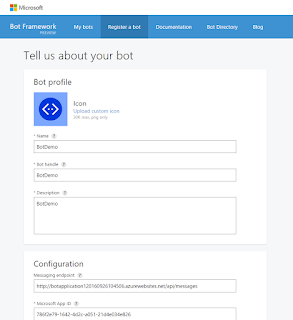
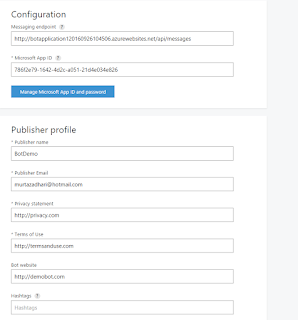
    • Fill in the requried fields
    • Enter messaging endpoint: Live Azure url + /api/messages (http://botapplication120160926104506.azurewebsites.net/api/messages)
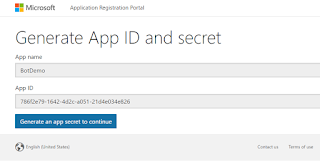
    • Click on Create Microsoft App Id and Password


    • Remember the App Id and Password that will be required to update the web.config and publish again to Azure.


    • Fill the remaining fields


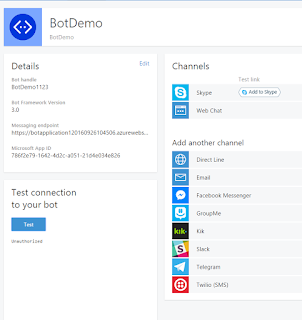
    • After creating the bot you should see the below screen


    If you press the Test then you will see the Unauthorized message. This is because we have published the bot with empty Microsoft App Id and Password.
    Now we will get the Id and Password created during Bot registration and update the web.config and publish it again to Azure Service.

    Updating Microsoft AppId and MicrosoftAppPassword

    Now head back to visual studio and update the web.config below app settings

      <add key="BotId" value="DemoBot" />
       <add key="MicrosoftAppId" value="786f2e79-1642-4d2c-a051-21d4e034e826" />
       <add key="MicrosoftAppPassword" value="Mz2OO8HPjeNfkqWz9JjWGZp" />

    Now publish the Bot Application to Azure site. You will just need to select the already created Azure App instead of creating new App.

    Testing Live Bot Url


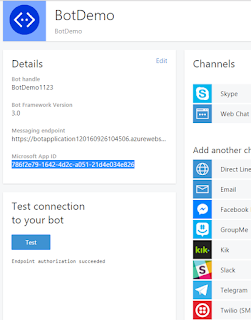
    If you go back to registered bot and now when you click on Test then you should see the Endpoint authorization succeeded.


    This tells that our service is up and running on Azure and Bot is registered as well.

    In next Part we will see how can configure Emulator to use Live Azure endpoint and test our bot.

    Sunday, September 25, 2016

    Microsoft Bot Builder .Net Using FormFlow - Part 1

    Microsoft Bot Builder is new and very powerful feature that can be use to utilise chat channels to automate communicate and do conversation with real world user.

    There are very good documentation how to start with Microsoft Bot Builder. Below are the links where you can quickly start with bot builder.

    How to install and setup project
    https://docs.botframework.com/en-us/csharp/builder/sdkreference/gettingstarted.html

    Getting started with Bot Builder
    https://docs.botframework.com/en-us/csharp/builder/sdkreference/

    Install and use Bot Emulator to test your Bot
    https://docs.botframework.com/en-us/tools/bot-framework-emulator/

    You will also find very good example on below link for understanding of basic FormFlow structure and usage.
    https://docs.botframework.com/en-us/csharp/builder/sdkreference/forms.html

    I will be providing the walk through of  real world example where user can register the purchased product with company. I will start from creating basic bot application to real world example by distributing articles in different parts.

    Usually for any type of registration below needs to be consider

    • In a form there will be fields that needs to be answer step by step.
    • Each fields need to be validated against certain requirement.
    • Submit the form at the end.
    • Send/Show confirmation message.


    If you have followed above links then you should be able to create new project using Visual Studio.

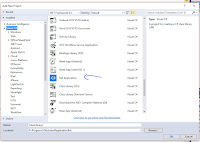
    Add New Project


    one thing to consider in web.config. There are three app settings

    
       <add key="BotId" value="YourBotId" />
    
       <add key="MicrosoftAppId" value="" />
    
       <add key="MicrosoftAppPassword" value="" />


    MicrofotAppId and MicrosoftAppPassword needs to be empty during development and debugging.
    We will have those settings when we will register our bot to https://dev.botframework.com/.
    We will be need to update this settings during the deployment of our app to Azure Service.


    Once you have project created you already have ready to use bot. Where user can send a message and bot will reply with number of characters in a message.

    If you want to test you can start project.

    Start Bot Application

    Debug (Menu) ---> Start Debugging. This will start web page with below message

    Start Bot Emulator


    Make sure Bot Base Url matches the url of your application and api/messages needs to appended to communicate with you message web api controller.


    Send/Receive Message through Emulator


    Once you received the message with number of characters then we are sured our Bot is now in working condition.

    This is the end of Part 1. In Part 2 we will be Registering our Bot to  https://dev.botframework.com/ and publishing our App to Azure Service.

    Saturday, September 24, 2016

    Generic Comparer for DistinctBy Using Func and IComparer For IEnumerable

    During development of many projects, I have been come across to develop IComparer for different reasons and situations. Each time creating new comparer for different classes. Therefore, I have found solution to use single generic Comparer for all the IEnumerable extension which requires IComparer for the class.

    I have used DistinctBy Example to go throw the Generic Extension Method.


     public static class Compare
        {
            public static IEnumerable<T> DistinctBy<T, TIdentity>(this IEnumerable<T> source, Func<T, TIdentity> identitySelector)
            {
                return source.Distinct(Compare.By(identitySelector));
            }
    
            public static IEqualityComparer<TSource> By<TSource, TIdentity>(Func<TSource, TIdentity> identitySelector)
            {
                return new DelegateComparer<TSource, TIdentity>(identitySelector);
            }
    
            private class DelegateComparer<T, TIdentity> : IEqualityComparer<T>
            {
                private readonly Func<T, TIdentity> identitySelector;
    
                public DelegateComparer(Func<T, TIdentity> identitySelector)
                {
                    this.identitySelector = identitySelector;
                }
    
                public bool Equals(T x, T y)
                {
                    return Equals(identitySelector(x), identitySelector(y));
                }
    
                public int GetHashCode(T obj)
                {
                    return identitySelector(obj).GetHashCode();
                }
            }
        }

    DistinctBy Extension Method


    The function simply creates an extension method for IEnumerable together with Func with input of Type and outputting property of type TIdentity.

    Using this way any class can provide the property that needs to be used for comparing and calculating hashcode for that property. However, TIdentity usually will be the unique key for the class object.

    IEqualityComparer

    This function simply create and object of Comparer passing in the Func delegate. The resulting DelegateComparer will use the Func Delegate to fetch the unique property and compare the unique property and calculate the hashcode.

    Usage

    
    public class AClass
    {
      public string AProperty {get; set;}
    }
    
    public IEnumerable<AClass> DistinctAClass(IEnumerable<AClass> aClassList)
    {
        aClassList.DistinctBy(a => a.AProperty);
    }


    Hope this helps to create unnecessary classes for comparer.

    Tuesday, September 20, 2016

    Working with Live Database

    Working with Live Database

    Connecting to live database from development environment


    1 - Never connect to live database from developer environment
    2 - If it is necessary to debug live database then ask for the live back up to be restored on staging database server
    3 - If it is necessary to work directly to live database from developer environment then follow below precautions


    If connecting to live database from developer environment then following things need to be considered


    First and foremost ask to take backup of live database so we don't loose any data - no backup, no work on live database


    * If connecting through code

    • Make sure all the scheduler are commented out/turned off
    • Make sure all the external service push or pull is commented our/turned off
    • Never update live database from developer environment - Fix the code and push it to live server and re run it.

    * If connecting through Sql server from developer environment


    • Always wraps command in BEGIN TRAN command see example below and comment out the COMMIT TRAN section so nothing applies to live server mistakenly
    BEGIN TRAN 
     update aa set City='chennai',LastName='vinoth'; 
    -- if update is what you want then
    -- COMMIT TRAN 
    -- if NOT then
    ROLLBACK

    • It's VERY IMPORTANT to remember to either COMMIT or ROLLBACK; This wouldn't be a good time to go to lunch while forgetting the transaction open!  :-) Open Transaction would lock the database.
    • If Update is necessary then always ask  I.T guy to do backup
    • If it is small task then make sure you run the select command first to make sure it will affect only required table and row for .eg

    SELECT Column1 , Column2
    -- UPDATE t SET Column1 = x, Column2 = y
    FROM MyTable AS t
    WHERE ...


    Always do the peer review before running any script or code on live databsae

    Adding Attributes on option tag of dropdown list box through reflection and Lambda Expression

    Using Html Helper and Lambda expression for creating dropdown list and applying attributes on options tag of dropdown list


    Traditional way of doing it.

    <select name="listbox" id="listbox">
        @foreach (var item in Model)
               {
    
                       <option value="@item.UserRoleId" data-name="@item.Name" data-class="@item.ClassName">
                          @item.UserRole 
                       </option>                  
               }
        </select>

    Instead of iterating through and attaching attributes inside foreach look
    We can do like below

    @Html.DropDownList(x => x.ReportName, Model.AvailableReports, x => x.TextField, x => x.NameField, "-- Select --", 
    new Dictionary<string, Expression<Func<ReportSummaryModel, object>>>{ {"data-name", x => x.ReportActualName}, {"data-class", x => x.ReportClassName}})

    It will output the select list with option tag and attribute on each option tag

    Output


    var s = new string();
    <select>
     <option>--Select--</option>
     <option value="1" data-name="NameA" data-class="classA">A</option>                  
        <option value="2" data-name="NameB" data-class="classB">B</option>                  
        <option value="3" data-name="NameC" data-class="classC">C</option>                  
        <option value="4" data-name="NameD" data-class="classD">D</option>                  
    </select>

    Generic Tempelate
    DropDownList<TPageModel, TSelectListModel, TProperty>
    • TPageModel : Model of Page
    • TSelectListModel : Model of Select List Item
    • TProperty: Will be object so can use any type
    The parameters of custom dropdown list

    public static MvcHtmlString DropDownList<TPageModel, TSelectListModel, TProperty>
    (this HtmlHelper<TPageModel> htmlHelper, 
      Expression<Func<TSelectListModel, TProperty>> expression, IEnumerable<TSelectListModel> selectList, 
    Expression<Func<TSelectListModel, TProperty>> textField, 
      Expression<Func<TSelectListModel, TProperty>> valueField, string optionLabel, IDictionary<string, 
    Expression<Func<TSelectListModel, TProperty>>> optionsAttributes)


    Parameters Descriptions
    Expression<Func<TSelectListModel, TProperty>> expression
    This is to provide the input property for which we are showing dropdown (Rename if want)


    IEnumerable<TSelectListModel> selectList
    List of class of which text and value field you will be using


    Expression<Func<TSelectListModel, TProperty>> textField
    Provide the text field property from the TSelectListModel


    Expression<Func<TSelectListModel, TProperty>> valueField
    Provide the value field property from the TSelectListModel


    string optionLabel
    Default Option Text for dropdown list box


    IDictionary<string, Expression<Func<TSelectListModel, TProperty>>> optionsAttributes
    This is to provide the attributes to be appear on option tag from the SelectListModel


    public static MvcHtmlString DropDownList<TPageModel, TSelectListModel, TProperty>(this HtmlHelper<TPageModel> htmlHelper, Expression<Func<TSelectListModel, TProperty>> expression, IEnumerable<TSelectListModel> selectList, Expression<Func<TSelectListModel, TProperty>> textField, Expression<Func<TSelectListModel, TProperty>> valueField, string optionLabel, IDictionary<string, Expression<Func<TSelectListModel, TProperty>>> optionsAttributes)
            {
                string name = ExpressionHelper.GetExpressionText(expression);
                string fullName = htmlHelper.ViewContext.ViewData.TemplateInfo.GetFullHtmlFieldName(name);
                string defaultValue = string.Empty;
                ModelState modelState;
                if (htmlHelper.ViewData.ModelState.TryGetValue(fullName, out modelState))
                {
                    if (modelState.Value != null)
                    {
                        defaultValue = (string)modelState.Value.ConvertTo(typeof(string), null /* culture */);
                    }
                }
                var listItemBuilder = new StringBuilder();
                // Make optionLabel the first item that gets rendered.
                if (optionLabel != null)
                {
                    listItemBuilder.AppendLine(ListItemToOption(optionLabel, string.Empty, false, null));
                }
                /* Loop through each options
                 * Convert each ListItem to an <option> tag */
                foreach (var listItem in selectList)
                {
                    string text = listItem.GetType()
                                          .GetProperties()
                                          .Single(p => p.Name.Equals(ClassHelper.PropertyName(textField)))
                                          .GetValue(listItem, null)
                                          .ToString();
                    string value = listItem.GetType()
                                           .GetProperties()
                                           .Single(p => p.Name.Equals(ClassHelper.PropertyName(valueField)))
                                           .GetValue(listItem, null)
                                           .ToString();
                    bool isSelected = value.Equals(defaultValue);
                    var htmlAttributes = new Dictionary<string, string>();
                    foreach (var option in optionsAttributes)
                    {
                        string propertyName = ClassHelper.PropertyName(option.Value);
                        htmlAttributes.Add(option.Key, listItem.GetType()
                                                                 .GetProperties()
                                                                 .Single(p => p.Name.Equals(propertyName))
                                                                 .GetValue(listItem, null)
                                                                 .ToString());
                    }
                    listItemBuilder.AppendLine(ListItemToOption(text, value, isSelected, htmlAttributes));
                }
                var tagBuilder = new TagBuilder("select")
                {
                    InnerHtml = listItemBuilder.ToString()
                };
                tagBuilder.MergeAttribute("name", fullName, true /* replaceExisting */);
                return new MvcHtmlString(tagBuilder.ToString(TagRenderMode.Normal));
            }

    Private method copied from mvc built in helper to generate option attribute

     internal static string ListItemToOption(string text, string value, bool isSelected, IDictionary<string, string> htmlAttributes)
            {
                var builder = new TagBuilder("option")
                {
                    InnerHtml = HttpUtility.HtmlEncode(text)
                };
                if (value != null)
                {
                    builder.Attributes["value"] = value;
                }
                if (isSelected)
                {
                    builder.Attributes["selected"] = "selected";
                }
                if (htmlAttributes != null)
                {
                    builder.MergeAttributes(htmlAttributes);
                }
                
                return builder.ToString(TagRenderMode.Normal);
            }


    Utility function to get property name

    public class ClassHelper
        {
            public static string PropertyName<TModel, TProperty>(Expression<Func<TModel, TProperty>> expression)
            {
                var body = expression.Body as MemberExpression;
                if (body == null)
                {
                    body = ((UnaryExpression)expression.Body).Operand as MemberExpression;
                }
                return body.Member.Name;
            }
        }