Wednesday, September 28, 2016

Microsoft Bot Builder .Net Using FormFlow - Part 2

In this part we will deploy the Bot Application that we have created in Part 1 to Azure Service and also register our bot to Bot Directoty in order to use Live Azure Service Url.
Publishing Bot

Firstly, we will publish the Bot to Azure. In order  to publish to Azure Services you will need to purchase azure services or If you have MSDN subscription for visual studio then you can have free monthly credit of $200 something.


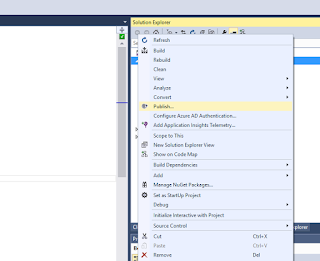
  • Coming back to Publish, right click to project and select publish. 


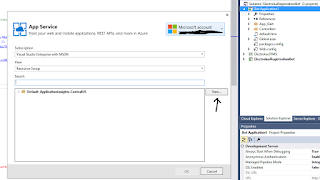
  • Then, click on Microsoft Azure App Service. 
  • Then, click on publish, you will have to with your azure login credentials. 
  • Once login you should be seeing below screen


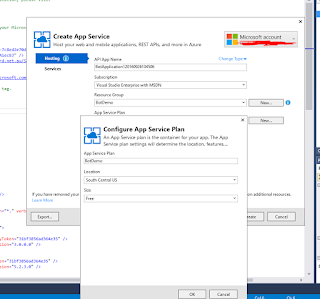
  • Click New button this will open popup to create new App inside Azure Service. Fill the required fields and select OK


  • Once you have complete wizard will provide all the details of server, url, deployment credentials and etc. 

We will need only live url for our Bot and everything else can be leave for now. Save the password so you don't have to remember it.
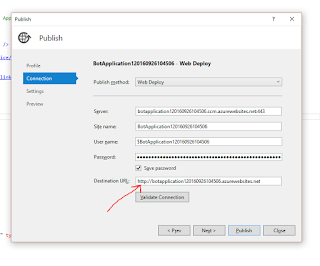
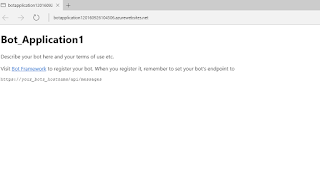
  • Click publish to publish the site. Once site is published successfully. you should be seeing below screen.


Registering Bot


In order to use live url we would need to register our Bot to https://dev.botframework.com/.
Please follow the below steps to register your newly created Bot and generate MicrosoftAppId and MicrosoftAppPassword.
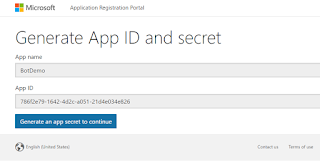

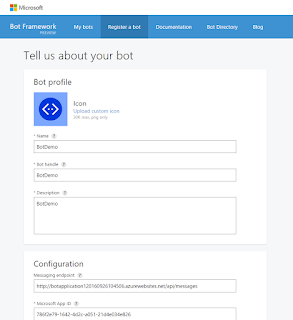
  • Go to the given url https://dev.botframework.com/bots/new
  • Login with Microsoft Credentials
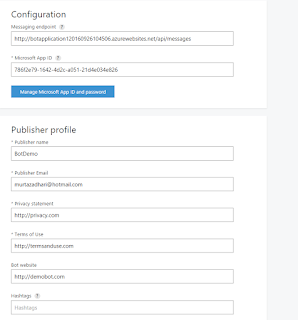
  • Fill in the requried fields
  • Enter messaging endpoint: Live Azure url + /api/messages (http://botapplication120160926104506.azurewebsites.net/api/messages)
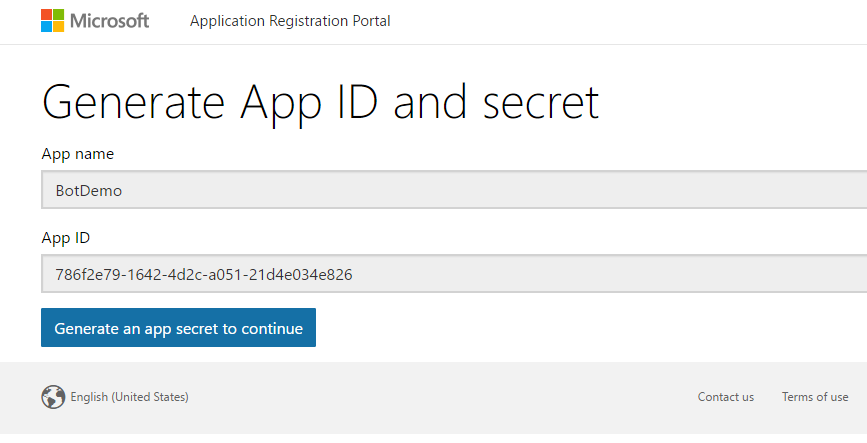
  • Click on Create Microsoft App Id and Password


  • Remember the App Id and Password that will be required to update the web.config and publish again to Azure.


  • Fill the remaining fields


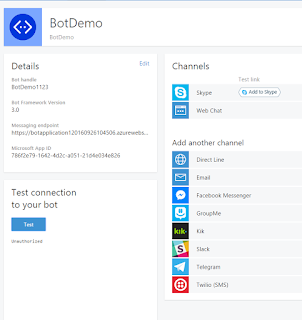
  • After creating the bot you should see the below screen


If you press the Test then you will see the Unauthorized message. This is because we have published the bot with empty Microsoft App Id and Password.
Now we will get the Id and Password created during Bot registration and update the web.config and publish it again to Azure Service.

Updating Microsoft AppId and MicrosoftAppPassword

Now head back to visual studio and update the web.config below app settings

  <add key="BotId" value="DemoBot" />
   <add key="MicrosoftAppId" value="786f2e79-1642-4d2c-a051-21d4e034e826" />
   <add key="MicrosoftAppPassword" value="Mz2OO8HPjeNfkqWz9JjWGZp" />

Now publish the Bot Application to Azure site. You will just need to select the already created Azure App instead of creating new App.

Testing Live Bot Url


If you go back to registered bot and now when you click on Test then you should see the Endpoint authorization succeeded.
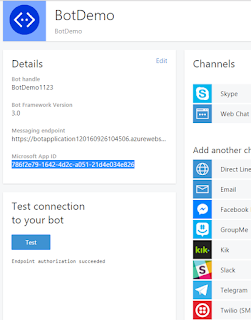


This tells that our service is up and running on Azure and Bot is registered as well.

In next Part we will see how can configure Emulator to use Live Azure endpoint and test our bot.

Sunday, September 25, 2016

Microsoft Bot Builder .Net Using FormFlow - Part 1

Microsoft Bot Builder is new and very powerful feature that can be use to utilise chat channels to automate communicate and do conversation with real world user.

There are very good documentation how to start with Microsoft Bot Builder. Below are the links where you can quickly start with bot builder.

How to install and setup project
https://docs.botframework.com/en-us/csharp/builder/sdkreference/gettingstarted.html

Getting started with Bot Builder
https://docs.botframework.com/en-us/csharp/builder/sdkreference/

Install and use Bot Emulator to test your Bot
https://docs.botframework.com/en-us/tools/bot-framework-emulator/

You will also find very good example on below link for understanding of basic FormFlow structure and usage.
https://docs.botframework.com/en-us/csharp/builder/sdkreference/forms.html

I will be providing the walk through of  real world example where user can register the purchased product with company. I will start from creating basic bot application to real world example by distributing articles in different parts.

Usually for any type of registration below needs to be consider

  • In a form there will be fields that needs to be answer step by step.
  • Each fields need to be validated against certain requirement.
  • Submit the form at the end.
  • Send/Show confirmation message.


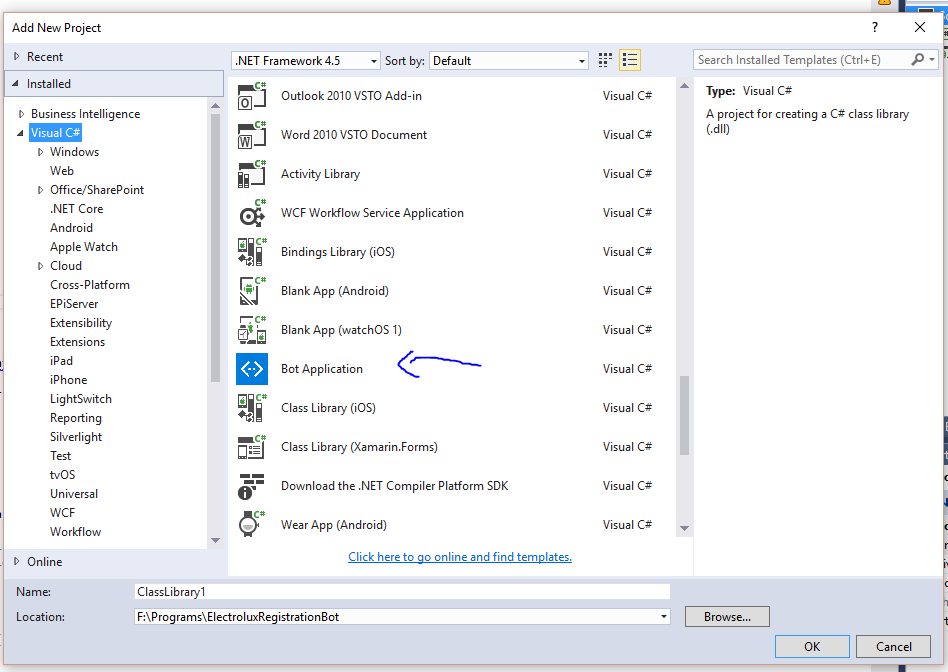
If you have followed above links then you should be able to create new project using Visual Studio.

Add New Project


one thing to consider in web.config. There are three app settings


   <add key="BotId" value="YourBotId" />

   <add key="MicrosoftAppId" value="" />

   <add key="MicrosoftAppPassword" value="" />


MicrofotAppId and MicrosoftAppPassword needs to be empty during development and debugging.
We will have those settings when we will register our bot to https://dev.botframework.com/.
We will be need to update this settings during the deployment of our app to Azure Service.


Once you have project created you already have ready to use bot. Where user can send a message and bot will reply with number of characters in a message.

If you want to test you can start project.

Start Bot Application

Debug (Menu) ---> Start Debugging. This will start web page with below message

Start Bot Emulator


Make sure Bot Base Url matches the url of your application and api/messages needs to appended to communicate with you message web api controller.


Send/Receive Message through Emulator


Once you received the message with number of characters then we are sured our Bot is now in working condition.

This is the end of Part 1. In Part 2 we will be Registering our Bot to  https://dev.botframework.com/ and publishing our App to Azure Service.

Saturday, September 24, 2016

Generic Comparer for DistinctBy Using Func and IComparer For IEnumerable

During development of many projects, I have been come across to develop IComparer for different reasons and situations. Each time creating new comparer for different classes. Therefore, I have found solution to use single generic Comparer for all the IEnumerable extension which requires IComparer for the class.

I have used DistinctBy Example to go throw the Generic Extension Method.


 public static class Compare
    {
        public static IEnumerable<T> DistinctBy<T, TIdentity>(this IEnumerable<T> source, Func<T, TIdentity> identitySelector)
        {
            return source.Distinct(Compare.By(identitySelector));
        }

        public static IEqualityComparer<TSource> By<TSource, TIdentity>(Func<TSource, TIdentity> identitySelector)
        {
            return new DelegateComparer<TSource, TIdentity>(identitySelector);
        }

        private class DelegateComparer<T, TIdentity> : IEqualityComparer<T>
        {
            private readonly Func<T, TIdentity> identitySelector;

            public DelegateComparer(Func<T, TIdentity> identitySelector)
            {
                this.identitySelector = identitySelector;
            }

            public bool Equals(T x, T y)
            {
                return Equals(identitySelector(x), identitySelector(y));
            }

            public int GetHashCode(T obj)
            {
                return identitySelector(obj).GetHashCode();
            }
        }
    }

DistinctBy Extension Method


The function simply creates an extension method for IEnumerable together with Func with input of Type and outputting property of type TIdentity.

Using this way any class can provide the property that needs to be used for comparing and calculating hashcode for that property. However, TIdentity usually will be the unique key for the class object.

IEqualityComparer

This function simply create and object of Comparer passing in the Func delegate. The resulting DelegateComparer will use the Func Delegate to fetch the unique property and compare the unique property and calculate the hashcode.

Usage


public class AClass
{
  public string AProperty {get; set;}
}

public IEnumerable<AClass> DistinctAClass(IEnumerable<AClass> aClassList)
{
    aClassList.DistinctBy(a => a.AProperty);
}


Hope this helps to create unnecessary classes for comparer.

Tuesday, September 20, 2016

Working with Live Database

Working with Live Database

Connecting to live database from development environment


1 - Never connect to live database from developer environment
2 - If it is necessary to debug live database then ask for the live back up to be restored on staging database server
3 - If it is necessary to work directly to live database from developer environment then follow below precautions


If connecting to live database from developer environment then following things need to be considered


First and foremost ask to take backup of live database so we don't loose any data - no backup, no work on live database


* If connecting through code

  • Make sure all the scheduler are commented out/turned off
  • Make sure all the external service push or pull is commented our/turned off
  • Never update live database from developer environment - Fix the code and push it to live server and re run it.

* If connecting through Sql server from developer environment


  • Always wraps command in BEGIN TRAN command see example below and comment out the COMMIT TRAN section so nothing applies to live server mistakenly
BEGIN TRAN 
 update aa set City='chennai',LastName='vinoth'; 
-- if update is what you want then
-- COMMIT TRAN 
-- if NOT then
ROLLBACK

  • It's VERY IMPORTANT to remember to either COMMIT or ROLLBACK; This wouldn't be a good time to go to lunch while forgetting the transaction open!  :-) Open Transaction would lock the database.
  • If Update is necessary then always ask  I.T guy to do backup
  • If it is small task then make sure you run the select command first to make sure it will affect only required table and row for .eg

SELECT Column1 , Column2
-- UPDATE t SET Column1 = x, Column2 = y
FROM MyTable AS t
WHERE ...


Always do the peer review before running any script or code on live databsae

Adding Attributes on option tag of dropdown list box through reflection and Lambda Expression

Using Html Helper and Lambda expression for creating dropdown list and applying attributes on options tag of dropdown list


Traditional way of doing it.

<select name="listbox" id="listbox">
    @foreach (var item in Model)
           {

                   <option value="@item.UserRoleId" data-name="@item.Name" data-class="@item.ClassName">
                      @item.UserRole 
                   </option>                  
           }
    </select>

Instead of iterating through and attaching attributes inside foreach look
We can do like below

@Html.DropDownList(x => x.ReportName, Model.AvailableReports, x => x.TextField, x => x.NameField, "-- Select --", 
new Dictionary<string, Expression<Func<ReportSummaryModel, object>>>{ {"data-name", x => x.ReportActualName}, {"data-class", x => x.ReportClassName}})

It will output the select list with option tag and attribute on each option tag

Output


var s = new string();
<select>
 <option>--Select--</option>
 <option value="1" data-name="NameA" data-class="classA">A</option>                  
    <option value="2" data-name="NameB" data-class="classB">B</option>                  
    <option value="3" data-name="NameC" data-class="classC">C</option>                  
    <option value="4" data-name="NameD" data-class="classD">D</option>                  
</select>

Generic Tempelate
DropDownList<TPageModel, TSelectListModel, TProperty>
  • TPageModel : Model of Page
  • TSelectListModel : Model of Select List Item
  • TProperty: Will be object so can use any type
The parameters of custom dropdown list

public static MvcHtmlString DropDownList<TPageModel, TSelectListModel, TProperty>
(this HtmlHelper<TPageModel> htmlHelper, 
  Expression<Func<TSelectListModel, TProperty>> expression, IEnumerable<TSelectListModel> selectList, 
Expression<Func<TSelectListModel, TProperty>> textField, 
  Expression<Func<TSelectListModel, TProperty>> valueField, string optionLabel, IDictionary<string, 
Expression<Func<TSelectListModel, TProperty>>> optionsAttributes)


Parameters Descriptions
Expression<Func<TSelectListModel, TProperty>> expression
This is to provide the input property for which we are showing dropdown (Rename if want)


IEnumerable<TSelectListModel> selectList
List of class of which text and value field you will be using


Expression<Func<TSelectListModel, TProperty>> textField
Provide the text field property from the TSelectListModel


Expression<Func<TSelectListModel, TProperty>> valueField
Provide the value field property from the TSelectListModel


string optionLabel
Default Option Text for dropdown list box


IDictionary<string, Expression<Func<TSelectListModel, TProperty>>> optionsAttributes
This is to provide the attributes to be appear on option tag from the SelectListModel


public static MvcHtmlString DropDownList<TPageModel, TSelectListModel, TProperty>(this HtmlHelper<TPageModel> htmlHelper, Expression<Func<TSelectListModel, TProperty>> expression, IEnumerable<TSelectListModel> selectList, Expression<Func<TSelectListModel, TProperty>> textField, Expression<Func<TSelectListModel, TProperty>> valueField, string optionLabel, IDictionary<string, Expression<Func<TSelectListModel, TProperty>>> optionsAttributes)
        {
            string name = ExpressionHelper.GetExpressionText(expression);
            string fullName = htmlHelper.ViewContext.ViewData.TemplateInfo.GetFullHtmlFieldName(name);
            string defaultValue = string.Empty;
            ModelState modelState;
            if (htmlHelper.ViewData.ModelState.TryGetValue(fullName, out modelState))
            {
                if (modelState.Value != null)
                {
                    defaultValue = (string)modelState.Value.ConvertTo(typeof(string), null /* culture */);
                }
            }
            var listItemBuilder = new StringBuilder();
            // Make optionLabel the first item that gets rendered.
            if (optionLabel != null)
            {
                listItemBuilder.AppendLine(ListItemToOption(optionLabel, string.Empty, false, null));
            }
            /* Loop through each options
             * Convert each ListItem to an <option> tag */
            foreach (var listItem in selectList)
            {
                string text = listItem.GetType()
                                      .GetProperties()
                                      .Single(p => p.Name.Equals(ClassHelper.PropertyName(textField)))
                                      .GetValue(listItem, null)
                                      .ToString();
                string value = listItem.GetType()
                                       .GetProperties()
                                       .Single(p => p.Name.Equals(ClassHelper.PropertyName(valueField)))
                                       .GetValue(listItem, null)
                                       .ToString();
                bool isSelected = value.Equals(defaultValue);
                var htmlAttributes = new Dictionary<string, string>();
                foreach (var option in optionsAttributes)
                {
                    string propertyName = ClassHelper.PropertyName(option.Value);
                    htmlAttributes.Add(option.Key, listItem.GetType()
                                                             .GetProperties()
                                                             .Single(p => p.Name.Equals(propertyName))
                                                             .GetValue(listItem, null)
                                                             .ToString());
                }
                listItemBuilder.AppendLine(ListItemToOption(text, value, isSelected, htmlAttributes));
            }
            var tagBuilder = new TagBuilder("select")
            {
                InnerHtml = listItemBuilder.ToString()
            };
            tagBuilder.MergeAttribute("name", fullName, true /* replaceExisting */);
            return new MvcHtmlString(tagBuilder.ToString(TagRenderMode.Normal));
        }

Private method copied from mvc built in helper to generate option attribute

 internal static string ListItemToOption(string text, string value, bool isSelected, IDictionary<string, string> htmlAttributes)
        {
            var builder = new TagBuilder("option")
            {
                InnerHtml = HttpUtility.HtmlEncode(text)
            };
            if (value != null)
            {
                builder.Attributes["value"] = value;
            }
            if (isSelected)
            {
                builder.Attributes["selected"] = "selected";
            }
            if (htmlAttributes != null)
            {
                builder.MergeAttributes(htmlAttributes);
            }
            
            return builder.ToString(TagRenderMode.Normal);
        }


Utility function to get property name

public class ClassHelper
    {
        public static string PropertyName<TModel, TProperty>(Expression<Func<TModel, TProperty>> expression)
        {
            var body = expression.Body as MemberExpression;
            if (body == null)
            {
                body = ((UnaryExpression)expression.Body).Operand as MemberExpression;
            }
            return body.Member.Name;
        }
    }

Wednesday, July 23, 2014

Resetting password without knowing old password and also by providing secret answer together in one application

In some application we might want to let user change their passwords through secret answer or by entering their old password or without getting their old password.
What if user forgets these information and we want an admin to generate new temporary password for user so they can login and change their password again.
These all things cannot be achieved by just providing one membership provider. Therefore, we would need to add two membership provider and will switch to appropriate provider when required.

Lets consider below two config settings for membership provider


 <membership defaultProvider="SqlServerMembershipProvider" userIsOnlineTimeWindow="10" hashAlgorithmType="HMACSHA512">  
    <providers>  
     <clear />  
     <add name="SqlServerMembershipProvider" requiresQuestionAndAnswer="false" passwordFormat="Hashed" />  
     <add name="SqlServerMembershipProviderRequiresSecretAnswer" requiresQuestionAndAnswer="true" passwordFormat="Hashed" />  
    </providers>  
   </membership>  

I have removed the unrelated attributes from the providers for the brevity. The change in above two providers is requiredQuestionAndAnswer="true" in one provider and in other it is set to false.

Normally for a user to change password the process is they click on forgot password link
Then we ask for username or email and then we sent email to user with reset password link and on that specific link we ask user to provide new password. This process is fine as we are updating password without knowing new password.
Most of the developer would write below code to update password
 
  public bool UpdateMemberPassword(string username, string newPassword)  
     {  
       if (string.IsNullOrWhiteSpace(username))  
         throw new ArgumentNullException("username");  
       if (string.IsNullOrWhiteSpace(newPassword))  
         throw new ArgumentNullException("newPassword");  
       MembershipUser user = GetMemberByUsername(username);  
       if (user == null)  
         throw new Exception("user could not be found");  
       // Membership change password without knowing the old password http://stackoverflow.com/questions/5013901/asp-net-membership-change-password-without-knowing-old-one  
       bool isChanged = user.ChangePassword(user.ResetPassword(), newPassword);  
       return isChanged;  
     }  

Now if you also want to allow the user to change password through secret question and answer then the default provider would not work as it has set requireQuestionAnswer="false".


membershipProvider.ResetPassword(userName, answer); 


 The provided function will always update the user password regardless the provided answer is correct or not as the required secret queston answer is set to false.

So how do we work around. Here the second provider comes into play which has set requrieQuestionAnswer="true"

If user wants to change password through secret question and answer you will have to change the function as below

 
 public bool ValidateAnswerForUser(string userName, string answer)  
     {  
       if (string.IsNullOrWhiteSpace(userName))  
         throw new ArgumentNullException("userName");  
       if (string.IsNullOrWhiteSpace(answer))  
         throw new ArgumentNullException("answer");  
       MembershipUser user = GetMemberByUsername(userName);  
       if (user == null)  
         throw new ArgumentNullException("user does not exists");  
       string password;  
       try  
       {  
         /* The reason for using different membership provider other than default one is that,  
         * the default has set requiresQuestionAndAnswer="false" so, even if you provide the wrong secret answer provider will simply reset the password.  
         * Therefore, here i am switching the provider with configuration requiresQuestionAndAnswer="true" so if user provides the wrong answer then it will throw exception"  
         */  
         var membershipProvider = Membership.Providers["SqlServerMembershipProviderRequiresSecretAnswer"];  
         if (membershipProvider != null)  
         {  
           password = membershipProvider.ResetPassword(userName, answer);  
         }  
         else  
         {  
           password = Membership.Provider.ResetPassword(userName, answer);  
         }  
       }  
       catch (MembershipPasswordException e)  
       {  
         return false;  
       }  
       if (string.IsNullOrWhiteSpace(password))  
         return false;  
       return true;  
     }  

This will update the password only if provided answer matches the answer in system.

Friday, August 24, 2012

Hazrat Moses, Butcher and a mother's Prayer

Once Prophet Musa (a.s.) asked Allah (SWT) that who would be my neighbor in Heaven (Jannat). Allah replied that it would be that butcher…..

Prophet Musa (a.s.) was quite surprised and went to search for that butcher. He saw that the butcher was busy selling meat in his shop. At his day end he wrapped a piece of meat in clothe and returned home. To find out more about his house he pretended to be his guest for the night and the butcher readily accepted.

After reaching home he cooked the meat baked some bread and soaked the bread in the dish and went into a room where an extremely old lady was laying on the bed. With much effort he raised the old women from the bed and gave her food bite by bite. When he had finished serving the food he wiped her face. The old woman then said something in the butcher’s ears which made him to smile and laid her back on the bed and came out of the room.

Prophet Musa who was watching all this, asked the butcher, “who is this lady and what did she say in your ears that brought a smile on your face?”

The butcher replied, “O stranger, she is my mother. The first thing I do after returning home is to serve her. She gets pleased everyday and prays that may Allah make me the neighbor of Prophet Musa in Jannah, and on this I smile, look at my status and the status of Musa Kaleem ul Allah."


We Read in Surah Al-Israa, Ayah Number 23-24,

وَقَضَى رَبُّكَ أَلاَّ تَعْبُدُواْ إِلاَّ إِيَّاهُ وَبِالْوَالِدَيْنِ إِحْسَانًا إِمَّا يَبْلُغَنَّ عِندَكَ الْكِبَرَ أَحَدُهُمَا أَوْ كِلاَهُمَا فَلاَ تَقُل لَّهُمَا أُفٍّ وَلاَ تَنْهَرْهُمَا وَقُل لَّهُمَا قَوْلاً كَرِيمًا
And your Lord has commanded that you shall not serve (any) but Him, and goodness to your parents. If either or both of them reach old age with you, say not to them (so much as) "Ugh" nor chide them, and speak to them a generous word.

وَاخْفِضْ لَهُمَا جَنَاحَ الذُّلِّ مِنَ الرَّحْمَةِ وَقُل
رَّبِّ ارْحَمْهُمَا كَمَا رَبَّيَانِي صَغِيرًا

And make yourself submissively gentle to them with compassion, and say: O my Lord! have compassion on them, as they brought me up (when I was) little.
May god Give us Taufeeq to serve our Parents throughout our life time, Aameen.