Monday, November 28, 2016

Adding New MetaDataPlus Dictionary Field and Assigning it to Catalog Entry Class

We will be adding new catalog entry class and will be assigning new meta dictionary field with multiple values.

Adding new Catalog Entry (ProductBase) Class


    [CatalogContentType(GUID = "C39413F3-310C-49C6-A4C4-6B86D6788401", MetaClassName = "ProductBase")]
    public class ProductBase  : ProductContent
    {
       [Searchable]
        [IncludeInDefaultSearch]
        [BackingType(typeof(PropertyDictionarySingle))]
        [Display(Order = 60)]
        [Required]
        public virtual string ProductType { get; set; }
    }


Now we will be defining initializing class to add new meta field and assign it to Catalog Entry(ProductBase) class


[ModuleDependency(typeof(ServiceContainerInitialization))]
 [InitializableModule]
 public class CatalogInitialization : IConfigurableModule
 {
  private bool _isInitialized;

  public void Initialize(InitializationEngine context)
  {
   if (_isInitialized)
    return;

   SyncMetaClassAndField();

   _isInitialized = true;
  }

  public void Uninitialize(InitializationEngine context)
  {
   _isInitialized = false;
  }

  public void ConfigureContainer(ServiceConfigurationContext context)
  {
   context.Container.Configure(ctx => ctx.AddRegistry());
  }

  private static void SyncMetaClassAndField()
  {
    var metaProClass = Mediachase.MetaDataPlus.Configurator.MetaClass.Load(MetaDataContext.Instance, "ProductBase");
                  MetaField metaProp = MetaField.Load(MetaDataContext.Instance, "ProductType");

      if (metaProp == null)
      {
                      metaProp = Mediachase.MetaDataPlus.Configurator.MetaField.Create(MetaDataContext.Instance, "Mediachase.Commerce.Catalog", "ProductType", "Product Type", "Product Type Description", MetaDataType.DictionarySingleValue, 1000, false, false, false, false);
                    }
                  metaProp.Dictionary.Add("Baby", "Baby");
                  metaProp.Dictionary.Add("Toddler", "Toddler");
                  metaProp.Dictionary.Add("Junior", "Junior");
                  metaProp.Dictionary.Add("Walker", "Walker");
                  metaProClass.AddField(metaProp);
        }
 }

Friday, November 4, 2016

Using EPiServer IMigratoinSteps To Automatically Add EPi Commerce Market, Warehouse, Payment and Shipping Method

In one of my application i had to setup Initial Market, Mulitple Warehouses, Payment Method and Shipping Method in order to make thing available for editors.

I got some of the help from the QuickSilver ImportSiteContent Class. However, it was missing how to add new market and warehouses.

I will strongly recommend to look at above class to understand more about it.

We will now go through how to add Market, Warehouses, Shipping Method and Payment Method.

IMigrationStep

In one of my question that i asked on EPiServer Forum, the guy replied that IMigrationStep is an internal class and should not be used because it will void the support contract and can have break change impact in future release. So please guys use it with caution.

We will need to decorate our class

[ServiceConfiguration(typeof(IMigrationStep))]


[ServiceConfiguration(typeof(IMigrationStep))]
    public class ImportNZSiteContent : IMigrationStep
    {   
 public int Order { get { return 2010; } }
        public string Name { get { return "Adding Market, Warehouse and Shipping"; } }
        public string Description { get { return "Adding NZ/AU Market, Multiple Warehouses for NZ and Free Shipping method"; } }
  
 public bool Execute(IProgressMessenger processMessenger)
        {
            _progressMessenger =  processMessenger;
            _progressMessenger.AddProgressMessageText("Adding/Updating New Zealand Market and Warehouse", false, 0);
            try
            {
   
     }   
            catch (Exception exception)
            {
                _processMessenger.AddProgressMessageText("ImportTreasureSiteContent failed: " + exception.Message + "Stack trace:" + exception.StackTrace, true, 0);                
                return false;
            }
            return true;
        }
     }

Re-Testing 

The Migration will only run once per database therefore, if you want to re-test then change the name or namespace of the class and re run the site.

Verify Migration Step
Once you will brows the CMS site it and login with Admin credential, System will provide you the migration step summary. 

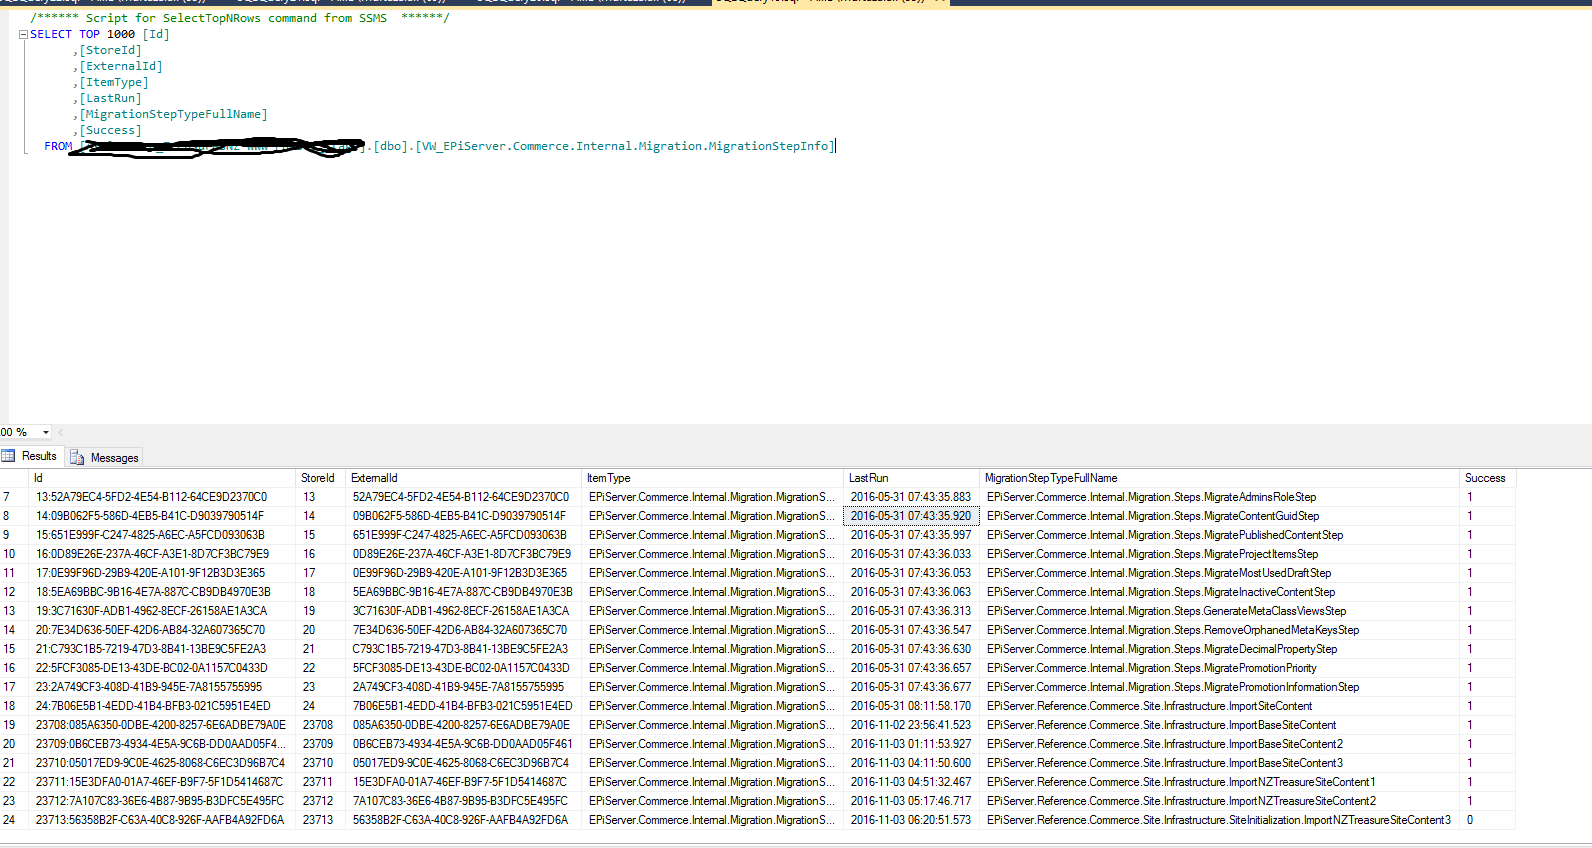
Another way to check if migration was run successfully is to look at the view [dbo].[VW_EPiServer.Commerce.Internal.Migration.MigrationStepInfo]) in CMS Site.


Market

By Default EPi Commerce provides IMarket Implementaion MarketImpl but this class does not have setter function to set new values therefore, we will need to add our own class for IMarket interface. We will inherit from the MarketImp in order keep thing simple and easy.


internal class SiteMarketImp : MarketImpl, IMarket
    {
        public new MarketId MarketId { get; set; }
        public new bool IsEnabled { get; set; }
        public new string MarketName { get; set; }
        public new string MarketDescription { get; set; }
        public new CultureInfo DefaultLanguage { get; set; }
        public new IEnumerable<CultureInfo> Languages { get; set; }
        public new Currency DefaultCurrency { get; set; }
        public new IEnumerable<Currency> Currencies { get; set; }
        public new IEnumerable<string> Countries { get; set; }

        /// <summary>
        /// Creates an empty IMarket instance with the specified market identifier.
        /// </summary>
        /// <param name="marketId"></param>
        public SiteMarketImp (MarketId marketId) : base(marketId)
        {
            this.MarketId = marketId;
        }

        /// <summary>Creates a copy of the passed IMarket instance.</summary>
        /// <param name="market">The IMarket instance to copy.</param>
        public SiteMarketImp (IMarket market) : base(market)
        {
            this.MarketId = market.MarketId;
            this.IsEnabled = market.IsEnabled;
            this.MarketName = market.MarketName;
            this.MarketDescription = market.MarketDescription;
            this.DefaultLanguage = market.DefaultLanguage;
            this.DefaultCurrency = market.DefaultCurrency;
        }
    }


Function to Add/Update Market


    private IMarket AddNzMarket()
        {
            MarketId NZ_Market_ID = new MarketId("NZL"); 
            var nzCulture = CultureInfo.GetCultureInfo("en-NZ");
            var nzCurrency = new Currency("NZD");
            var allMarkets = _marketService.GetAllMarkets();
            var nzMarket = allMarkets.FirstOrDefault(m => m.MarketId == NZ_Market_ID);
            bool isCreating = nzMarket == null;
            var updatedNzMarket = isCreating ? new SiteMarketImp (new MarketId("NZL")) : new SiteMarketImp (nzMarket);

            /* Get the country just to make sure it exists */
            var countryDto = CountryManager.GetCountry("NZL", false);

            /* countryDto Table 0 is for State/Province and 1 is for Country 
             * countryDto Row is to get the country code
             */
            if (countryDto == null || countryDto.Tables.Count < 2 || countryDto.Tables[1].Rows.Count < 0)
                throw new ContentNotFoundException("New Zealand Country Could not be found in EPi Commerce");

            /* All the requried fields need to be populated */
            updatedNzMarket.MarketName = "New Zealand";
            updatedNzMarket.MarketDescription = "New Zealand";
            updatedNzMarket.Countries = new List<string> { "NZL" };
            updatedNzMarket.Currencies = new List<Currency> { nzCurrency };
            updatedNzMarket.DefaultCurrency = nzCurrency;
            updatedNzMarket.Languages = new List<CultureInfo> { nzCulture };
            updatedNzMarket.DefaultLanguage = nzCulture;
            updatedNzMarket.IsEnabled = true;

           /* Save NZ Market */
            if (isCreating)
                _marketService.CreateMarket(updatedNzMarket);
            else
                _marketService.UpdateMarket(updatedNzMarket);

            return updatedNzMarket;
        }


Add/Update Warehouses


    private void AddNzWarehouses()
        {
            /* Adding/Updating two ware houses */
            var nzSouth = "NZSouth";
            var nzNorth = "NZNorth";
            var warehouses =_warehouseRepository.List().ToList();

            /* Add/Update South Island Warehouse */
            var nzWarehouse = warehouses.FirstOrDefault(w => w.Code == nzSouth);
            var nzSouthWarehouse= nzWarehouse == null ? new Warehouse() : new Warehouse(nzWarehouse);
            SaveWarehouse(nzSouthWarehouse, nzSouth, "New Zealand South Island Warehouse", true);

            /* Add/Update North Island Warehouse */
            nzWarehouse = warehouses.FirstOrDefault(w => w.Code == nzNorth);
            var nzNorthWarehouse = nzWarehouse == null ? new Warehouse() : new Warehouse(nzWarehouse);
            SaveWarehouse(nzNorthWarehouse, nzNorth, "New Zealand North Island Warehouse", false);
        }   
     private void SaveWarehouse(Warehouse warehouse, string code, string name, bool isPrimary)
        {
            warehouse.ApplicationId = AppContext.Current.ApplicationId;
            warehouse.Code = code;
            warehouse.Name = name;
            warehouse.IsActive = true;
            warehouse.IsPrimary = isPrimary;
            warehouse.IsFulfillmentCenter = true;
            warehouse.IsPickupLocation = false;
            warehouse.IsDeliveryLocation = true;
            warehouse.ContactInformation = new WarehouseContactInformation(warehouse.ContactInformation);
            _warehouseRepository.Save(warehouse);
        }


Add/Update ShippingMethod


  private void AddNzShippingMethod(IMarket market)
        {
            var markets = new List<IMarket> {market};
            foreach (var language in market.Languages.Distinct())
            {
                var languageId = language.TwoLetterISOLanguageName;
                var dto = ShippingManager.GetShippingMethods(languageId);
                DeleteShippingMethods(dto);
                ShippingManager.SaveShipping(dto);

                var shippingSet = CreateShippingMethodsForLanguageAndCurrencies(dto, markets, languageId);
                ShippingManager.SaveShipping(dto);

                AssociateShippingMethodWithMarkets(dto, markets, shippingSet);
                ShippingManager.SaveShipping(dto);
            }
        }

        private void DeleteShippingMethods(ShippingMethodDto dto)
        {
            foreach (var method in dto.ShippingMethod)
            {
                method.Delete();
            }
        }

        private IEnumerable<ShippingMethodDto.ShippingMethodRow> CreateShippingMethodsForLanguageAndCurrencies(ShippingMethodDto dto, IEnumerable<IMarket> markets, string languageId)
        {
            var shippingOption = dto.ShippingOption.First(x => x.Name == "Generic Gateway");
            var shippingMethods = new List<ShippingMethodDto.ShippingMethodRow>();
            var sortOrder = 1;

            var nzdCostRegular = new Money(0, Currency.NZD);

            foreach (var currency in markets.SelectMany(m => m.Currencies).Distinct())
            {
                shippingMethods.Add(CreateShippingMethod(dto, shippingOption, languageId, sortOrder, "Regular-" + currency, string.Format("Regular {0} (4 - 5 days) ({1})", currency, languageId), nzdCostRegular, currency));
            }

            return shippingMethods;
        }

        private ShippingMethodDto.ShippingMethodRow CreateShippingMethod(ShippingMethodDto dto, ShippingMethodDto.ShippingOptionRow shippingOption, string languageId, int sortOrder, string name, string description, Money costInNzd, Currency currency)
        {
            return dto.ShippingMethod.AddShippingMethodRow(
                Guid.NewGuid(),
                shippingOption,
                AppContext.Current.ApplicationId,
                languageId,
                true,
                name,
                "Free Delivery",
                costInNzd.Amount,
                currency,
                description,
                false,
                sortOrder,
                DateTime.Now,
                DateTime.Now);
        }

        private void AssociateShippingMethodWithMarkets(ShippingMethodDto dto, IEnumerable<IMarket> markets, IEnumerable<ShippingMethodDto.ShippingMethodRow> shippingSet)
        {
            foreach (var shippingMethod in shippingSet)
            {
                foreach (var market in markets.Where(m => m.Currencies.Contains<Currency>(shippingMethod.Currency)))
                {
                    dto.MarketShippingMethods.AddMarketShippingMethodsRow(market.MarketId.Value, shippingMethod);
                }
            }
        }

Friday, October 28, 2016

Pre and Post Action/Function Decorator

In one of the old project, I had to intercept the call for the existing function in order to log and do some stuff therefore, In order to achieve that without modifying the existing function as it was working and was old enough not to touch. Therefore, After going through resources i came across this article which describes the function decorator.

I decided to implement the ActionExtension to implement Pre and Post Interceptor for existing functions.

The ActionExtension function looks like below.

Note: The action interceptor are need to be defined depending on the number of parameters. I had to implement it for action which accepted only two parameters therefore i had two action extension method which accepts two parameters. For different number of parameters you will need to add more action extensions.


 public static class ActionExtension
    {
        public static Action<targ1, targ2> PreProcessor<targ1, targ2>(this Action<targ1, targ2> action, Action<targ1, targ2> preActionToRun, Targ1 tArg1, Targ2 tarArg2)
        {
            return (TRArg1, TRarg2) =>
            {
                /* PreProcessing */
                preActionToRun(tArg1, tarArg2);

                /* Processing */
                action(tArg1, tarArg2);
            };
        }

        public static Action<targ1, targ2> PostProcessor<targ1, targ2>(this Action<targ1, targ2> action, Action<targ1, targ2> postActionToRun, Targ1 tArg1, Targ2 tarArg2)
        {
            return (TRArg1, TRarg2) =>
            {

                /* Processing */
                action(tArg1, tarArg2);

                /* PostProcessing */
                postActionToRun(tArg1, tarArg2);
            };

        }
    }

Wednesday, October 19, 2016

Converting Object Specific Properties to IDictionary<string, Object> Using Lambda Expression

Below function will convert the specific properties of any class to IDictionary<string, object>

The function is  an extension method for object type and takes params array of Expression<Func<T, object>>. The reason for outputting object in Func is to output any primary type such int, long, string, float and etc.

Registration Example Class


public class Registration 
{
        public int RegId {get; set;}
        public string RegName {get; set;}
        public string RegNotRequired {get; set;}
        public DateTime RegDate {get; set;}
        public string RegLocation {get; set;}
}


Example


Registration reg = new Registration 
                            {RegId = 1,
                             RegName = "Murtaza", 
                             RegNotRequired="Not Important", 
                             RegDate="2012-09-19", 
                             RegLocation ="Pakistan"};
IDictionary<string, object> val = reg.AsKeyAndValue(
                                      r => r.RegId, r => r.RegName, 
                                      r => r.RegDate, r => r.RegLocation);


Extension Method


Following function converts the class properties into IDictionary<string, object>


  public static IDictionary<string,object> AsObjectValueDictionary(this T obj,
            params Expression<func<object,string>>[] source)
        {
            Dictionary objectValyeDictionary = new Dictionary();
            foreach (var src in source)
            {
                var keyValue = obj.AsKeyValuePair(src);
                if(!objectValyeDictionary.ContainsKey(keyValue.Key))
                    objectValyeDictionary.Add(keyValue.Key, keyValue.Value);
            }

            return objectValyeDictionary;
        }

Helper Fucntion For Property Name


The below helper method is use to extract the property name from lambda expression


        public static KeyValuePair AsKeyValuePair(this object obj, Expression<func<object, tproperty>> propertyLambda)
        {
            var me = propertyLambda.Body as MemberExpression;
            UnaryExpression ue;
            if (me == null)
            {
                ue = propertyLambda.Body as UnaryExpression;

                if(ue == null)
                    throw new ArgumentException("You must pass a lambda of the form: '() => Class.Property' or '() => object.Property'");

                me = (MemberExpression) ue.Operand;
            }

            string memberName = me.Member.Name;
            var value = obj.GetType().GetProperty(memberName).GetValue(obj, null);
            return new KeyValuePair(me.Member.Name, value);
        }

Monday, October 17, 2016

Microsoft Bot Builder .Net Using FormFlow: Bot With Dependency Injection - Part 5

In this part

  1. We will include IoC Container using AutoFac for our service within Bot Form.

Lets Start

First we will have sample service which will provide product detail. This function is just prototype we won't provide any implementation.

Interface


    public interface IPimsServiceClient
    {
        IList GetModelDetail(int ProductId);

        /* Other functions as per requirements */
    }


Implementation


    public class PimsServiceClient : IPimsServiceClient
    {
        public IList GetModelDetail(int ProductId)
        {
            /*Implementation*/
        }

        /* Other functions as per requirements */
    }


Global.asax.cs

Update Global.asax.cs to setup IoC container using Autofac.


     public class WebApiApplication : System.Web.HttpApplication
    {
        protected void Application_Start()
        {
            var builder = new ContainerBuilder();

            // Get your HttpConfiguration.
            var config = GlobalConfiguration.Configuration;

            // Register your Web API controllers.
            builder.RegisterApiControllers(Assembly.GetExecutingAssembly()).PropertiesAutowired();

            // OPTIONAL: Register the Autofac filter provider.
            builder.RegisterWebApiFilterProvider(config);

            builder.RegisterType().As().WithParameter("serviceUrl", ConfigurationManager.AppSettings["PimsServiceUrl"]);

            builder.RegisterType().PropertiesAutowired();

            // Set the dependency resolver to be Autofac.
            var container = builder.Build();
            config.DependencyResolver = new AutofacWebApiDependencyResolver(container);

            GlobalConfiguration.Configure(WebApiConfig.Register);
        }
    }

Updating MessageController

We will add IComponentContext to message controller to resolve any services.


 public class MessagesController : ApiController
    {
        public static IComponentContext Context { get; set; }

        public MessagesController(IComponentContext context)
        {
           Context = context;
        }

        internal static IDialog MakeRootDialog()
        {
            return Chain.From(() => new FormDialog(new RegistrationForm(), Context.Resolve<RegistrationFormBuilder>().BuildForm));
        }
....
....


Adding Service as static property inside RegistrationFormBuilder


 [Serializable]
    public class RegistrationFormBuilder
    {
        public static IPimsServiceClient PimsServiceClient { get; set; }
        .....
        .....
        .....
        
         return new FormBuilder()
                    .Message("Welcome to the product registration bot!")
                    .Field(nameof(RegistrationForm.FirstName))
                    .Field(nameof(RegistrationForm.LastName))
                    .Field(nameof(RegistrationForm.Email))
                    .Field(nameof(RegistrationForm.ModelNumber), validate: async (state, value) =>
                {
                     var modelsSuggestion =  PimsServiceClient.GetModelDetail(productId);
                     ....
                     ....


This property can be use anywhere within RegistrationFormBuilder.


Tuesday, October 4, 2016

Microsoft Bot Builder .Net Using FormFlow: Real World Example of Product Registration - Part 4

In this part

  1. We will modify our Bot to work with real world example.
  2. We will create Bot that will ask use series of questions required to register product.
  3. We will also use validation to validate user input.

Lets Start

First we will have Registration Form in which we will have following fields required for registering any product.

  1. FirstName (string)
  2. LastName (string)
  3. Email (string, email)
  4. ModelNumber (string)
  5. DateOfPurchase (DateTime)
  6. State (Enum, {NSW, VIC, TAS, QLD, WA, NT})
  7. KeepMeUpdatedForProductsAndPromotions (bool)
Lets start by defining the classes

Registration Model


 [Serializable]
    public class RegistrationForm
    {
        public string FirstName { get; set; }

        public string LastName { get; set; }

        [Pattern(@"^\w+([\.+_])*\w+@\w+(\.\w+)+$")]
        [Template(TemplateUsage.NotUnderstood, "Email \"{0}\" is not valid.")]
        public string Email { get; set; }

        public string ModelNumber { get; set; }

        public DateTime DateOfPurchase { get; set; }

        [Prompt("At what {&} did you purchase product? {||}", ChoiceFormat = "{1}")]
        public List State { get; set; }
        [Describe("Whould you like to be keep updated regarding new products and promotions?")]
        public bool KeepMeUpdatedForProductsAndPromotions { get; set; }
       
    }

This is very simple model class to hold registration data.
This model defines basic properties together with these properties

  • We have used Pattern Attribute to validate email address through Regex.
  • We have used state enum to provide list to select from
  • We will use custom validation for Model number to validate the model number


Registration Form Builder Class


 [Serializable]
    public class RegistrationFormBuilder
    {

        public IForm BuildForm()
        {
            System.Net.ServicePointManager.ServerCertificateValidationCallback += (sender, certificate, chain, sslPolicyErrors) => true;
 
             OnCompletionAsyncDelegate  processOrder = async (context, state) =>
            {
                var message = context.MakeMessage();
                message.Text = "Your registration has been successfull.";
                await context.PostAsync(message);
            };

     
            return new FormBuilder()
                    .Message("Welcome to the product registration bot!")
                    .Field(nameof(RegistrationForm.FirstName))
                    .Field(nameof(RegistrationForm.LastName))
                    .Field(nameof(RegistrationForm.Email))
                    .Field(nameof(RegistrationForm.ModelNumber), validate: async (state, value) =>
                    {
                       // Validate Model number here
                        ValidateResult validateResult = new ValidateResult()
                        {
                            /*if modelSuggestion != null && modelsSuggestion.Any()*/
                            IsValid = true, //Set true or false
                            Value = value
                        };

                        return validateResult;
                    })
                    .Field(nameof(RegistrationForm.DateOfPurchase))
                    .Field(nameof(State))
                    .Field(nameof(RegistrationForm.KeepMeUpdatedForProductsAndPromotions))
                    .Confirm("Are the information correct?" +
                             "\n\rFirst Name:{FirstName}" +
                             "\n\rLast Name:{LastName}" +
                             "\n\rEmail:{Email}" +
                             "\n\r{&ModelNumber}:{ModelNumber}" +
                             "\n\r{&DateOfPurchase}:{DateOfPurchase}" +
                             "\n\rState:{State}" +
                             "\n\r{&KeepMeUpdatedForProductsAndPromotions}:{KeepMeUpdatedForProductsAndPromotions}?")
                    .OnCompletion(processOrder)
                    .Build();
        }
    }


The above Registration Form Builder is very simple. It will enable bot to ask one by one each property. Furthermore, the Bot is intelligent enough to ask for user input based on variable types.

How to Call Registration Form Builder in MessageController


 internal static IDialog MakeRootDialog()
        {
            var pimServiceClient = Context.Resolve();
            return Chain.From(() => new FormDialog(new RegistrationForm(), Context.Resolve().BuildForm));
        }

        [ResponseType(typeof(void))]
        public virtual async Task Post([FromBody] Activity activity)
        {
            if (activity != null)
            {
                
                // one of these will have an interface and process it
                switch (activity.GetActivityType())
                {
                    case ActivityTypes.Message:
                        await Conversation.SendAsync(activity, MakeRootDialog);
                        break;
                    case ActivityTypes.ConversationUpdate:
                    case ActivityTypes.ContactRelationUpdate:
                    case ActivityTypes.Typing:
                    case ActivityTypes.DeleteUserData:
                    default:
                        Trace.TraceError($"Unknown activity type ignored: {activity.GetActivityType()}");
                        break;
                }
            }
            var response = Request.CreateResponse(HttpStatusCode.OK);
            return response;
         }


Once you compile the solution and run the Emulator you should see the below flow of conversation.


In the next part we will enable the dependency injection of our service using Autofac.

Thursday, September 29, 2016

Unit testing Fake IP Address for Website

We were trying to fake the IP Address for one of our website for different visitors. Such as if some one visits the site from Australia or New Zealand then site should redirect to au or Beefeaterbbq.co.nz respectively.
We were able to test the redirect for Australia quite easily as we were based in Australia but for New Zealand it was bit of hard work as we could not find any Proxies that could fake NZ IP address for us. After doing searching and bit of struggle i have figured out we can alter Fiddler script to fake request header.
Therefore, I was able to add one line to output IP Address of my choice to whatever site as long as Fiddler intercepts the call from browser. Below are the steps to add custom header and test the site.

Pre-requisite

  1. Fiddler 2
  2. Any Browser :>

Steps to Fake IP Addresses

  • Open Fiddler and goto Rules
  • Select Customize Rules - This will open the CustomRules.js file in notepad


  • Search for function OnBeforeRequest

static function OnBeforeRequest(oSession: Session) {


    • At the end of function add below line

    oSession.oRequest.headers.Add("X-Forwarded-For", "14.1.63.255");  // NZ IP Address, DNS name or IP address of target server


    • Save the file
    • Make sure on fiddler -> File (Menu) -> Capture Traffic is checked

    • Once you are done don't forget to remove your line from CustomRules.js