Showing posts with label Microsoft Bot. Show all posts

Monday, October 17, 2016

Microsoft Bot Builder .Net Using FormFlow: Bot With Dependency Injection - Part 5

In this part

  1. We will include IoC Container using AutoFac for our service within Bot Form.

Lets Start

First we will have sample service which will provide product detail. This function is just prototype we won't provide any implementation.

Interface


    public interface IPimsServiceClient
    {
        IList GetModelDetail(int ProductId);

        /* Other functions as per requirements */
    }


Implementation


    public class PimsServiceClient : IPimsServiceClient
    {
        public IList GetModelDetail(int ProductId)
        {
            /*Implementation*/
        }

        /* Other functions as per requirements */
    }


Global.asax.cs

Update Global.asax.cs to setup IoC container using Autofac.


     public class WebApiApplication : System.Web.HttpApplication
    {
        protected void Application_Start()
        {
            var builder = new ContainerBuilder();

            // Get your HttpConfiguration.
            var config = GlobalConfiguration.Configuration;

            // Register your Web API controllers.
            builder.RegisterApiControllers(Assembly.GetExecutingAssembly()).PropertiesAutowired();

            // OPTIONAL: Register the Autofac filter provider.
            builder.RegisterWebApiFilterProvider(config);

            builder.RegisterType().As().WithParameter("serviceUrl", ConfigurationManager.AppSettings["PimsServiceUrl"]);

            builder.RegisterType().PropertiesAutowired();

            // Set the dependency resolver to be Autofac.
            var container = builder.Build();
            config.DependencyResolver = new AutofacWebApiDependencyResolver(container);

            GlobalConfiguration.Configure(WebApiConfig.Register);
        }
    }

Updating MessageController

We will add IComponentContext to message controller to resolve any services.


 public class MessagesController : ApiController
    {
        public static IComponentContext Context { get; set; }

        public MessagesController(IComponentContext context)
        {
           Context = context;
        }

        internal static IDialog MakeRootDialog()
        {
            return Chain.From(() => new FormDialog(new RegistrationForm(), Context.Resolve<RegistrationFormBuilder>().BuildForm));
        }
....
....


Adding Service as static property inside RegistrationFormBuilder


 [Serializable]
    public class RegistrationFormBuilder
    {
        public static IPimsServiceClient PimsServiceClient { get; set; }
        .....
        .....
        .....
        
         return new FormBuilder()
                    .Message("Welcome to the product registration bot!")
                    .Field(nameof(RegistrationForm.FirstName))
                    .Field(nameof(RegistrationForm.LastName))
                    .Field(nameof(RegistrationForm.Email))
                    .Field(nameof(RegistrationForm.ModelNumber), validate: async (state, value) =>
                {
                     var modelsSuggestion =  PimsServiceClient.GetModelDetail(productId);
                     ....
                     ....


This property can be use anywhere within RegistrationFormBuilder.


Tuesday, October 4, 2016

Microsoft Bot Builder .Net Using FormFlow: Real World Example of Product Registration - Part 4

In this part

  1. We will modify our Bot to work with real world example.
  2. We will create Bot that will ask use series of questions required to register product.
  3. We will also use validation to validate user input.

Lets Start

First we will have Registration Form in which we will have following fields required for registering any product.

  1. FirstName (string)
  2. LastName (string)
  3. Email (string, email)
  4. ModelNumber (string)
  5. DateOfPurchase (DateTime)
  6. State (Enum, {NSW, VIC, TAS, QLD, WA, NT})
  7. KeepMeUpdatedForProductsAndPromotions (bool)
Lets start by defining the classes

Registration Model


 [Serializable]
    public class RegistrationForm
    {
        public string FirstName { get; set; }

        public string LastName { get; set; }

        [Pattern(@"^\w+([\.+_])*\w+@\w+(\.\w+)+$")]
        [Template(TemplateUsage.NotUnderstood, "Email \"{0}\" is not valid.")]
        public string Email { get; set; }

        public string ModelNumber { get; set; }

        public DateTime DateOfPurchase { get; set; }

        [Prompt("At what {&} did you purchase product? {||}", ChoiceFormat = "{1}")]
        public List State { get; set; }
        [Describe("Whould you like to be keep updated regarding new products and promotions?")]
        public bool KeepMeUpdatedForProductsAndPromotions { get; set; }
       
    }

This is very simple model class to hold registration data.
This model defines basic properties together with these properties

  • We have used Pattern Attribute to validate email address through Regex.
  • We have used state enum to provide list to select from
  • We will use custom validation for Model number to validate the model number


Registration Form Builder Class


 [Serializable]
    public class RegistrationFormBuilder
    {

        public IForm BuildForm()
        {
            System.Net.ServicePointManager.ServerCertificateValidationCallback += (sender, certificate, chain, sslPolicyErrors) => true;
 
             OnCompletionAsyncDelegate  processOrder = async (context, state) =>
            {
                var message = context.MakeMessage();
                message.Text = "Your registration has been successfull.";
                await context.PostAsync(message);
            };

     
            return new FormBuilder()
                    .Message("Welcome to the product registration bot!")
                    .Field(nameof(RegistrationForm.FirstName))
                    .Field(nameof(RegistrationForm.LastName))
                    .Field(nameof(RegistrationForm.Email))
                    .Field(nameof(RegistrationForm.ModelNumber), validate: async (state, value) =>
                    {
                       // Validate Model number here
                        ValidateResult validateResult = new ValidateResult()
                        {
                            /*if modelSuggestion != null && modelsSuggestion.Any()*/
                            IsValid = true, //Set true or false
                            Value = value
                        };

                        return validateResult;
                    })
                    .Field(nameof(RegistrationForm.DateOfPurchase))
                    .Field(nameof(State))
                    .Field(nameof(RegistrationForm.KeepMeUpdatedForProductsAndPromotions))
                    .Confirm("Are the information correct?" +
                             "\n\rFirst Name:{FirstName}" +
                             "\n\rLast Name:{LastName}" +
                             "\n\rEmail:{Email}" +
                             "\n\r{&ModelNumber}:{ModelNumber}" +
                             "\n\r{&DateOfPurchase}:{DateOfPurchase}" +
                             "\n\rState:{State}" +
                             "\n\r{&KeepMeUpdatedForProductsAndPromotions}:{KeepMeUpdatedForProductsAndPromotions}?")
                    .OnCompletion(processOrder)
                    .Build();
        }
    }


The above Registration Form Builder is very simple. It will enable bot to ask one by one each property. Furthermore, the Bot is intelligent enough to ask for user input based on variable types.

How to Call Registration Form Builder in MessageController


 internal static IDialog MakeRootDialog()
        {
            var pimServiceClient = Context.Resolve();
            return Chain.From(() => new FormDialog(new RegistrationForm(), Context.Resolve().BuildForm));
        }

        [ResponseType(typeof(void))]
        public virtual async Task Post([FromBody] Activity activity)
        {
            if (activity != null)
            {
                
                // one of these will have an interface and process it
                switch (activity.GetActivityType())
                {
                    case ActivityTypes.Message:
                        await Conversation.SendAsync(activity, MakeRootDialog);
                        break;
                    case ActivityTypes.ConversationUpdate:
                    case ActivityTypes.ContactRelationUpdate:
                    case ActivityTypes.Typing:
                    case ActivityTypes.DeleteUserData:
                    default:
                        Trace.TraceError($"Unknown activity type ignored: {activity.GetActivityType()}");
                        break;
                }
            }
            var response = Request.CreateResponse(HttpStatusCode.OK);
            return response;
         }


Once you compile the solution and run the Emulator you should see the below flow of conversation.


In the next part we will enable the dependency injection of our service using Autofac.

Wednesday, September 28, 2016

Microsoft Bot Builder .Net Using FormFlow - Part 3

In this part we will test our live azure service on Microsoft Bot Emulator Channel.

Let first make sure our azure service is up and running.

Live Bot Url Testing


Make sure azure live url (http://botapplication120160926104506.azurewebsites.net/api/messages) on browsing returns result similar to below screen shot.


Make sure live azure service returns success on bot page


Connecting to Microsoft Bot Emulator Channel


Lets launch emulator and enter the below fields

  • Bot Url
  • Microsoft App Id
  • Microsoft App Password


Once you enter the above field and enter any message you will see something like below screen shot.


The reason for failing of message is that live azure could not connect back to Emulator url.
In order to make our bot url available to azure live url we need to work with NGROK.

NGORK

Ngor is small utility which makes local port number available to outside world.
you can download the ngork from the following url (https://ngrok.com/download)

Once downloaded the ngrok run the following command through command prompt
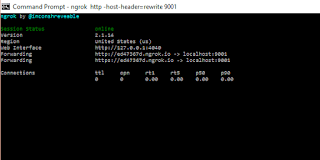
ngrok http -host-header=rewrite 9001


Once you run the command you will see the below output


The forwarding url is the url availble to outside world, which is mapped to our local port 9001
Copy that url and paste in Microsoft Emulator Url


Now you type the message you will see the output 


Things to remember


  • Bot url must have /api/messages appended
  • Emulator url can have http or https 
  • Bot url can have http or https
In next part we will modify our bot to use real world example of registering product.

Microsoft Bot Builder .Net Using FormFlow - Part 2

In this part we will deploy the Bot Application that we have created in Part 1 to Azure Service and also register our bot to Bot Directoty in order to use Live Azure Service Url.

Publishing Bot

Firstly, we will publish the Bot to Azure. In order  to publish to Azure Services you will need to purchase azure services or If you have MSDN subscription for visual studio then you can have free monthly credit of $200 something.


  • Coming back to Publish, right click to project and select publish. 


  • Then, click on Microsoft Azure App Service. 
  • Then, click on publish, you will have to with your azure login credentials. 
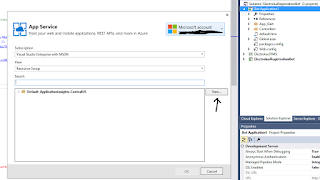
  • Once login you should be seeing below screen


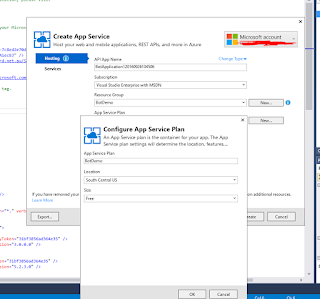
  • Click New button this will open popup to create new App inside Azure Service. Fill the required fields and select OK


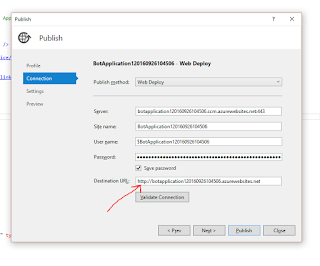
  • Once you have complete wizard will provide all the details of server, url, deployment credentials and etc. 

We will need only live url for our Bot and everything else can be leave for now. Save the password so you don't have to remember it.


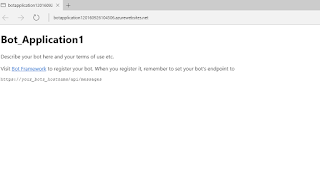
  • Click publish to publish the site. Once site is published successfully. you should be seeing below screen.


Registering Bot


In order to use live url we would need to register our Bot to https://dev.botframework.com/.
Please follow the below steps to register your newly created Bot and generate MicrosoftAppId and MicrosoftAppPassword.


  • Go to the given url https://dev.botframework.com/bots/new
  • Login with Microsoft Credentials
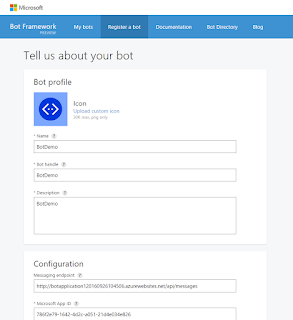
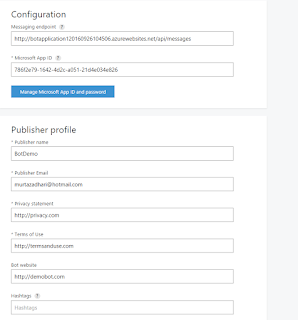
  • Fill in the requried fields
  • Enter messaging endpoint: Live Azure url + /api/messages (http://botapplication120160926104506.azurewebsites.net/api/messages)
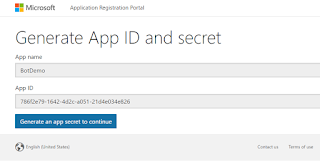
  • Click on Create Microsoft App Id and Password


  • Remember the App Id and Password that will be required to update the web.config and publish again to Azure.


  • Fill the remaining fields


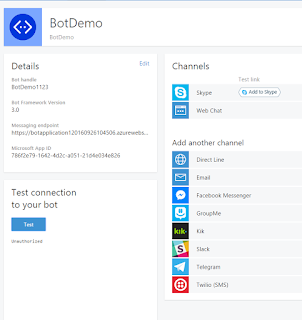
  • After creating the bot you should see the below screen


If you press the Test then you will see the Unauthorized message. This is because we have published the bot with empty Microsoft App Id and Password.
Now we will get the Id and Password created during Bot registration and update the web.config and publish it again to Azure Service.

Updating Microsoft AppId and MicrosoftAppPassword

Now head back to visual studio and update the web.config below app settings

  <add key="BotId" value="DemoBot" />
   <add key="MicrosoftAppId" value="786f2e79-1642-4d2c-a051-21d4e034e826" />
   <add key="MicrosoftAppPassword" value="Mz2OO8HPjeNfkqWz9JjWGZp" />

Now publish the Bot Application to Azure site. You will just need to select the already created Azure App instead of creating new App.

Testing Live Bot Url


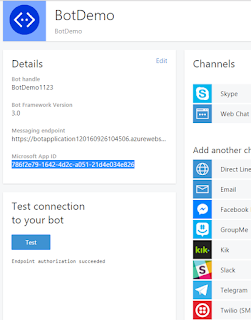
If you go back to registered bot and now when you click on Test then you should see the Endpoint authorization succeeded.


This tells that our service is up and running on Azure and Bot is registered as well.

In next Part we will see how can configure Emulator to use Live Azure endpoint and test our bot.

Sunday, September 25, 2016

Microsoft Bot Builder .Net Using FormFlow - Part 1

Microsoft Bot Builder is new and very powerful feature that can be use to utilise chat channels to automate communicate and do conversation with real world user.

There are very good documentation how to start with Microsoft Bot Builder. Below are the links where you can quickly start with bot builder.

How to install and setup project
https://docs.botframework.com/en-us/csharp/builder/sdkreference/gettingstarted.html

Getting started with Bot Builder
https://docs.botframework.com/en-us/csharp/builder/sdkreference/

Install and use Bot Emulator to test your Bot
https://docs.botframework.com/en-us/tools/bot-framework-emulator/

You will also find very good example on below link for understanding of basic FormFlow structure and usage.
https://docs.botframework.com/en-us/csharp/builder/sdkreference/forms.html

I will be providing the walk through of  real world example where user can register the purchased product with company. I will start from creating basic bot application to real world example by distributing articles in different parts.

Usually for any type of registration below needs to be consider

  • In a form there will be fields that needs to be answer step by step.
  • Each fields need to be validated against certain requirement.
  • Submit the form at the end.
  • Send/Show confirmation message.


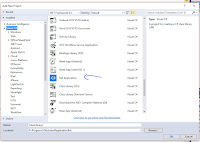
If you have followed above links then you should be able to create new project using Visual Studio.

Add New Project


one thing to consider in web.config. There are three app settings


   <add key="BotId" value="YourBotId" />

   <add key="MicrosoftAppId" value="" />

   <add key="MicrosoftAppPassword" value="" />


MicrofotAppId and MicrosoftAppPassword needs to be empty during development and debugging.
We will have those settings when we will register our bot to https://dev.botframework.com/.
We will be need to update this settings during the deployment of our app to Azure Service.


Once you have project created you already have ready to use bot. Where user can send a message and bot will reply with number of characters in a message.

If you want to test you can start project.

Start Bot Application

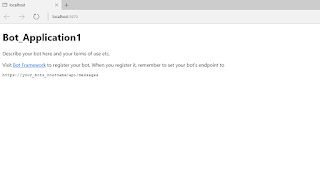
Debug (Menu) ---> Start Debugging. This will start web page with below message

Start Bot Emulator


Make sure Bot Base Url matches the url of your application and api/messages needs to appended to communicate with you message web api controller.


Send/Receive Message through Emulator


Once you received the message with number of characters then we are sured our Bot is now in working condition.

This is the end of Part 1. In Part 2 we will be Registering our Bot to  https://dev.botframework.com/ and publishing our App to Azure Service.