In this part we will deploy the Bot Application that we have created in Part 1 to Azure Service and also register our bot to Bot Directoty in order to use Live Azure Service Url.
We will need only live url for our Bot and everything else can be leave for now. Save the password so you don't have to remember it.
In order to use live url we would need to register our Bot to https://dev.botframework.com/.
Please follow the below steps to register your newly created Bot and generate MicrosoftAppId and MicrosoftAppPassword.

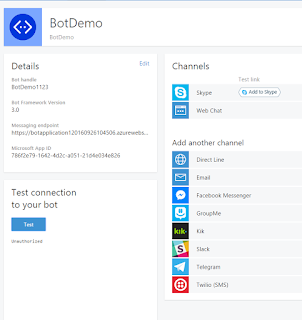
If you press the Test then you will see the Unauthorized message. This is because we have published the bot with empty Microsoft App Id and Password.
Now we will get the Id and Password created during Bot registration and update the web.config and publish it again to Azure Service.
<add key="BotId" value="DemoBot" />
<add key="MicrosoftAppId" value="786f2e79-1642-4d2c-a051-21d4e034e826" />
<add key="MicrosoftAppPassword" value="Mz2OO8HPjeNfkqWz9JjWGZp" />
Now publish the Bot Application to Azure site. You will just need to select the already created Azure App instead of creating new App.
If you go back to registered bot and now when you click on Test then you should see the Endpoint authorization succeeded.
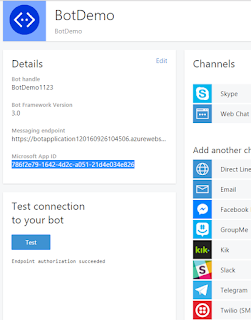
This tells that our service is up and running on Azure and Bot is registered as well.
In next Part we will see how can configure Emulator to use Live Azure endpoint and test our bot.
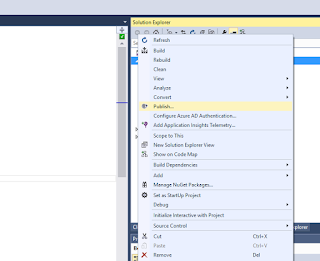
Publishing Bot
Firstly, we will publish the Bot to Azure. In order to publish to Azure Services you will need to purchase azure services or If you have MSDN subscription for visual studio then you can have free monthly credit of $200 something.- Coming back to Publish, right click to project and select publish.

- Then, click on Microsoft Azure App Service.
- Then, click on publish, you will have to with your azure login credentials.
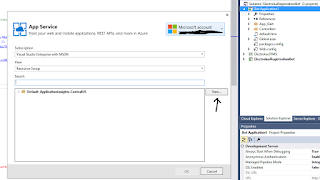
- Once login you should be seeing below screen

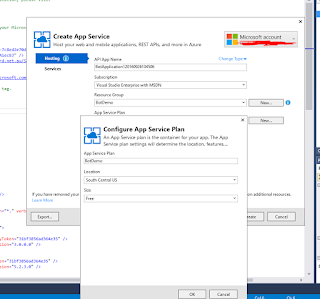
- Click New button this will open popup to create new App inside Azure Service. Fill the required fields and select OK

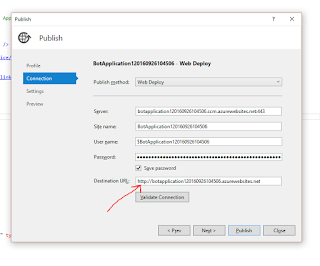
- Once you have complete wizard will provide all the details of server, url, deployment credentials and etc.
We will need only live url for our Bot and everything else can be leave for now. Save the password so you don't have to remember it.

- Click publish to publish the site. Once site is published successfully. you should be seeing below screen.

Registering Bot
In order to use live url we would need to register our Bot to https://dev.botframework.com/.
Please follow the below steps to register your newly created Bot and generate MicrosoftAppId and MicrosoftAppPassword.
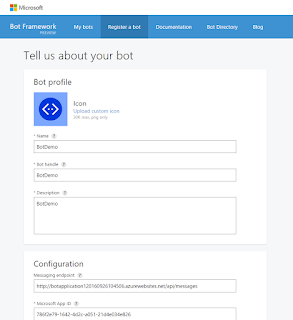
- Go to the given url https://dev.botframework.com/bots/new
- Login with Microsoft Credentials
- Fill in the requried fields
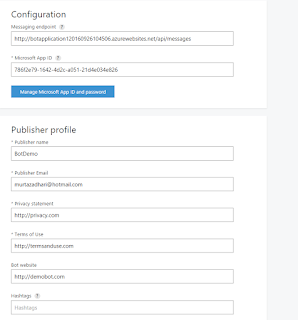
- Enter messaging endpoint: Live Azure url + /api/messages (http://botapplication120160926104506.azurewebsites.net/api/messages)
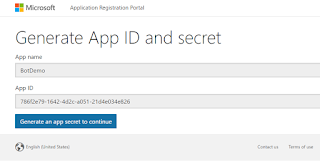
- Click on Create Microsoft App Id and Password
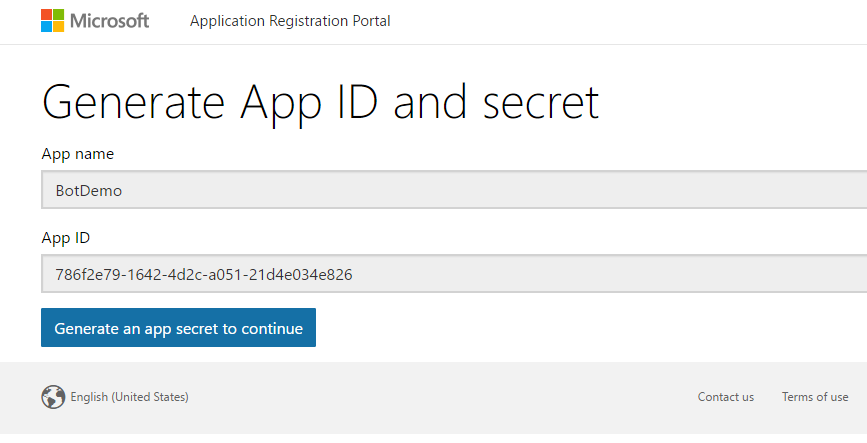
- Remember the App Id and Password that will be required to update the web.config and publish again to Azure.

- Fill the remaining fields


- After creating the bot you should see the below screen

If you press the Test then you will see the Unauthorized message. This is because we have published the bot with empty Microsoft App Id and Password.
Now we will get the Id and Password created during Bot registration and update the web.config and publish it again to Azure Service.
Updating Microsoft AppId and MicrosoftAppPassword
Now head back to visual studio and update the web.config below app settings<add key="BotId" value="DemoBot" />
<add key="MicrosoftAppId" value="786f2e79-1642-4d2c-a051-21d4e034e826" />
<add key="MicrosoftAppPassword" value="Mz2OO8HPjeNfkqWz9JjWGZp" />
Now publish the Bot Application to Azure site. You will just need to select the already created Azure App instead of creating new App.
Testing Live Bot Url
If you go back to registered bot and now when you click on Test then you should see the Endpoint authorization succeeded.

This tells that our service is up and running on Azure and Bot is registered as well.
In next Part we will see how can configure Emulator to use Live Azure endpoint and test our bot.
Thanks for providing your information, keep update with us. Azure Online Training
ReplyDeleteThis comment has been removed by the author.
ReplyDeleteThis comment has been removed by the author.
ReplyDeletethanks u for your wonderful ingormation
ReplyDeletehttps://www.acte.in/microsoft-azure-training-in-chennai
https://www.acte.in/microsoft-windows-azure-training-in-bangalore
https://www.acte.in/microsoft-windows-azure-training-in-hyderabad
https://www.acte.in/microsoft-windows-azure-training-in-pune
https://www.acte.in/microsoft-azure-training
THIS INFORMATION IS MORE HELPFUL TO ME Azure Training in Chennai | Certification | Azure Online Training Course | Azure Training in Bangalore | Certification | Azure Online Training Course | Azure Training in Hyderabad | Certification | Azure Online Training Course | Azure Training in Pune | Certification | Azure Online Training Course | Azure Training | microsoft azure certification | Azure Online Training Course
ReplyDeleteMMORPG OYUNLAR
ReplyDeleteinstagram takipçi satın al
tiktok jeton hilesi
Tiktok Jeton Hilesi
Saç Ekim Antalya
İnstagram takipçi satın al
İnstagram takipci
METİN PVP
instagram takipçi satın al
En son çıkan perde modelleri
ReplyDeleteSms onay
turkcell mobil ödeme bozdurma
nft nasıl alınır
ANKARA EVDEN EVE NAKLİYAT
trafik sigortasi
Dedektör
websitesi kurma
Aşk Romanları
smm panel
ReplyDeletesmm panel
İsilanlariblog.com
İnstagram takipçi satın al
hirdavatciburada.com
https://www.beyazesyateknikservisi.com.tr/
SERVİS
tiktok jeton hilesi
en son çıkan perde modelleri
ReplyDeleteözel ambulans
uc satın al
minecraft premium
nft nasıl alınır
lisans satın al
en son çıkan perde modelleri
yurtdışı kargo